
Archery is one of the oldest sports still practiced in the modern world. Still, the bows, arrows, and other accessories utilized in archery have changed dramatically.
Traditional bows operate with a simple mechanism, while modern bows are complex and have more mechanics involved in their operation. You have to understand how your bow works to utilize it properly.
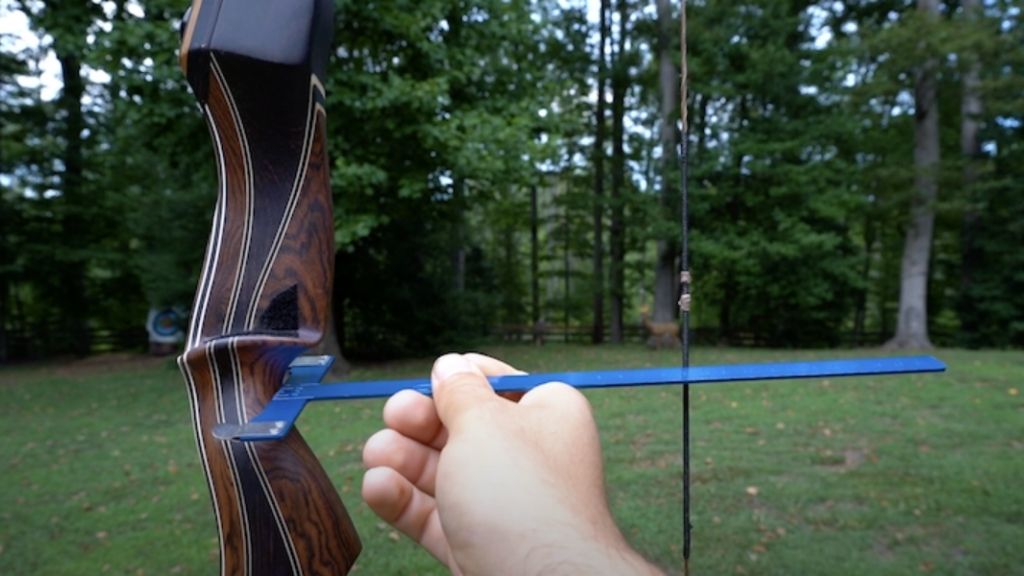
If you want to check the brace height, you have to measure it from the deep part of the grip, which is also called the pivot point. You will need a bow square and a bow stringer to adjust the brace height. Then, add or take out the string to alter the brace height on the recurve now. To reduce the brace height, eliminate the twists and add more twists to improve the brace height.
In this article, we look at what brace height is. How to check the brace height and how to adjust it.
The brace height directly impacts the flight of your arrow. Therefore, you must know about measuring and adjusting the brace height on your recurve bow.
Contents
What is Brace Height?
An assembled recurve bow that is not drawn is the one you should use to check brace height, and it is also to be measured in a straight line and not otherwise.
Your grip and string should be in place, and it applies to all designs and models of recurve bows.
The distance between the grip of the recurve bow’s deepest part and the undrawn string where the arrow will be placed is called brace height.
Archers always check this before taking a shot, especially in competitions where they participate.
Since the brace height directly impacts the arrow’s path, it is crucial to ensure it is correct. There are specifications for the brace height provided, which you can follow to ensure that your brace height is right in place before the shot is taken.
How Do You Check Brace Height?
Archers use different techniques to check the brace height before taking a shot. It is often a personal choice and preference for each archer. There are no hard and fast rules that have to be followed to check the brace height of your recurve bow.
However, one familiar, easy, and cheap method to check the brace height is to use a ruler or a measurement scale. You can keep the ruler between the recurve bow’s deepest point in a straight line and keep the other end towards the string.
The measurement between them is the exact brace height of your recurve bow. Using a bow square helps with the accuracy of the measurements or height of their recurve bow. It is something that is practiced by archers universally, especially while in competitions.
A simple ruler will do the trick if you do not want to invest in a bow square. Bow squares are used for greater accuracy in taking the measurements of the brace height. The brace height determines excessive pre-tension or less on the bow.
The Importance Of Having The Right Brace Height
We would not discuss the length of the brace height of the recurve bow if it did not have an effect on your archery skills. Different things get affected by not having the right brace height on the recurve bow, and here are the crucial factors affected.
Speed
One of the things most impacted by a wrong brace height is the speed at which the arrow travels. If the brace height of your recurve bow is lower, your arrow will travel faster. The string plays a role when you release the arrow.
Along with the arrow, the string of your recurve bow travels in the opposite direction. So, having the right brace height would ensure that your arrow travels as fast as it possibly can once you release it. Speed loss means power loss for an arrow.
Vibrations or Disruptions
The vibration of your bow, arrow, and string would be higher if the recurve bow had a lower brace height. There would also be a significant disruption that may have caused the arrow to miss its intended target. So, it is important to have the correct brace height.
Pre-Tension
The pre-tension of the bow is something that you should consider too. If you have a shorter brace height, you tend to have lower pre-tension. However, if the brace height on your recurve bow is higher, you will have more pre-tension than required.
Therefore, it can affect the longevity of the string, bow, and other equipment involved. Having the right pre-tension is essential for any recurve bow. The best part is that you can adjust the brace height with relative ease, which we will discuss in a moment.
Accuracy
Accuracy is one of the metrics in any bow that you use. If you can not strike precisely, you can never become a skilled archer. Having the right brace height on your recurve bow would enable you to hit a target consistently.
The arrow would move to the left or right of the target, depending on which-handed archer you are. You lose the accuracy factor if your brace height is not correct. So, ensure that the brace height is appropriate for your recurve bow.
How To Adjust Brace Height?
Now, you might have understood what brace height is, how to check it, and how it impacts your archery skills. We will now tell you the methods you can use to adjust the brace height on your recurve bow, and it can be done in simple and easy steps.
Step 1: Use a bowstring and attach it to the limbs of your recurve bow. It would help you protect the limbs and safely unstring your bow. The stringing and unstringing of a bow are very simple to do, and there are videos on the internet that can help you with this.
Step 2: Adding or removing twists to your bowstring would do the job of adjusting the brace height on your recurve bow. Remember that 20 or more twist changes can shorten the lifespan of your bowstring.
The maximum adjustment that you can do is a little less than 3 centimeters. If you require more adjustments than 3 centimeters, you can use a different bow string altogether.
Step 3: Replace the string and remeasure your brace height to ensure that the recommended adjustments have been made. If they are not achieved, you can redo the entire process until you attain the right brace height for your recurve bow.
Tip: As a beginner, you would not know the exact brace height required for your recurve bow. There are charts on the internet that provide you with the minimum and maximum brace height. It gives you the recommended brace height, depending on the bow length.
Conclusion
Use these simple steps to check and adjust the brace height on your recurve bow. Remember that regular checking of the brace height is necessary.
New strings are susceptible to expanding rapidly, and therefore, the brace height can change dramatically from one day to another.
Checking before you begin practicing can ensure that your brace height is always appropriate for the shots you are about to take.
Always practice caution when making adjustments. Remember that the bowstring would be under much tension, and not handling it properly can lead to injuries.
Damages to the recurve bow and limbs are also possible if they are not handled properly while unstringing the string.